What To Pack For An ATV Ride

What to pack for an ATV ride depends on many factors. Where you plan to ride. What the season is. How far you're willing to ride from potential help. And what everyone else in your group is packing. Knowing whether you'll have cell service is also an important factor in what to pack. Your ride capacity is also a factor—a UTV such as a Polaris General, for example, can easily carry a lot more tools and safety gear than a sport ATV.
What you choose to carry in your ride of choice is ultimately up to you—but here are some basic recommendations (and a couple of extra suggestions based on my years of riding).
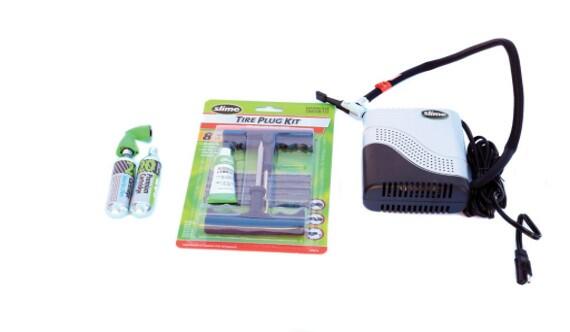
1. Tire Service Kit
Your tire service kit should include the following:
- 12v compressor
- a tire plug kit
- a wrench that can remove your lug nuts
- a ratchet strap to squeeze the tire around the centre if it gets knocked off of the bead.
Getting a tire off the ground in order to fix it is also important. Winches and say, trees can be a good way to get front tires off of the ground. Rear tires are a bit trickier, but if you have 2-3 people, simply tipping an ATV up on its side is not difficult. UTVs are trickier, and may require packing some type of jack.
2. Basic Tool Kit + Some Add Ons
Everyone needs to carry a tool kit. It’s up to you what to carry in your tool kit, but it needs to match your abilities, ride conditions, and correspond to what your particular bike may require, such as the correct size spark plug wrench. It is easier to carry multi use tools that do more than one job. A screwdriver that holds all the bits you need, for example. Folding pliers that have several other tools like, say, a knife, scissors, an awl, etc. Vise grips, electrical tape, whatever you may feel is important to carry in your application.
Besides my standard tools, I also carry:
- A quality, tough LED flashlight (cell phone flashlights are useful, but not strong enough in some cases).
- Lightweight jumper cables in at least one bike.
- A quality first aid kit in a decent quality case (they take a beating on the trail).
- Cloth wipers in a strong Ziploc bag with the air squeezed out.
The tire service kit and tool kit need to be kept as waterproof as possible. I found a strong zippered bag that fits both kits, then placed those inside giant Ziplocs to keep everything dry and useable. I then use the cloth wipers in another Ziploc bag to cushion everything and prevent it all from banging around as much as possible. All of this will take a beating on the trail, so keeping it together, and preventing it from flopping around by securing with bungee cords or some other method is very important.
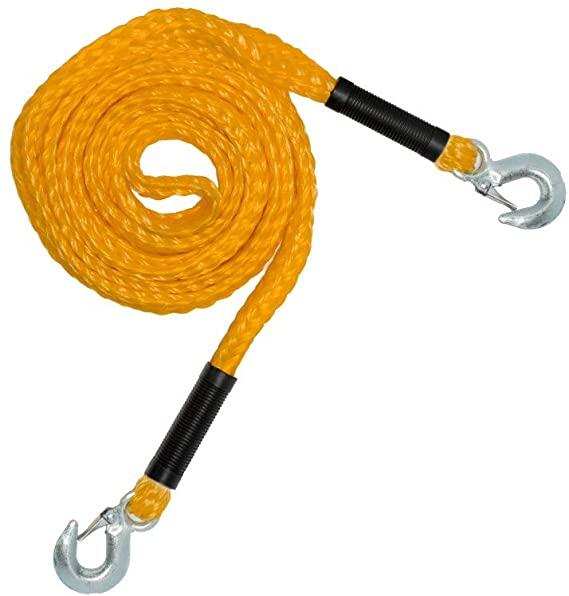
3. Tow Rope
I always carry two of these, one frequently overlooked reason to use them is to tie a winching ATV off to a tree at the rear, so it doesn’t slide the ATV / UTV toward whatever you are winching, giving you far more winching power. They also make a great tow rope, much better than a winch line. A 4,500 lb. working load is good for most users. They are great for extending the winch line up to an extra 30’ or so when needed.
4. Tool for Destroying Mud
My best value tool on the trail is actually a kids toy! I can’t even tell you how many times it's got me, and others too, out of a jam on the trail. It’s a “super squirter” that holds about 1 litre of water in a plastic pipe, and can blast it out up to 70 ft. away with good volume, and pressure. The reason it’s so useful is because it can clear mud from clogged radiator fins—mud that causes the radiator and the bikes to overheat. Find any water source—pond, stream, river, lake—draw it full and blast away at the clogged radiator. It has never failed me yet, or left anyone else broken down on the trail that I ran into for that reason, and max six or so draws has done the trick for me. It looks something like this, and is readily available online for under $20. The Aqua Zooka AZ-12 is pictured below, and is the exact one that I use. I never ride without the kids toy!
5. Rain Gear
I have excellent advice on this one! I found that normal rain gear just will not cut the mustard. I had a Wetskins 2 pc. suit that left me soaked more than once—the water came right through the stitching after a while. Other rain gear had the same result. Yes, it is possible to use real rain gear (usually heavy, and yellow) but if you have ever ridden in that type of rain gear, you already know the first thing that happens is you get really hot, sweaty, and very clammy, and it’s just miserable in very short order. It’s also bulky, and heavy to pack, making it a real pain to use.
I ran into someone wearing odd-looking rain gear during a storm, and they told me they were wearing Frogg Toggs” All Sport Rain Suit. My XL size is $75. Trust me, if you follow the link, ignore the negative comments, they aren’t using them as designed, and it is possible to rip them against sharp edges. My first pair lasted seven years, (without ripping them) and more than 30 times on long rides, and in heavy rain. What makes these so good is that they let air pass right through them, yet even in a lengthy downpour you will arrive bone dry, and yes, not sweaty either. I wouldn’t have believed it myself without experiencing it. On top of that, they weigh absolutely nothing. Mine came with a tote bag, and both items together roll down to the size of a small rolled bath towel.
6. Garbage Bag
Carrying a garbage bag with you at all times is always a good idea. It's not only for your own garbage, but also useful for picking up other trash found out in the bush too! We try to pick up something at every stop. At the very least, if you pack it in, pack it all back out.
Riding Remote? Here Are Additional Items to Consider
For those that like to ride trails that are not part of a club—those far away trails, or out-of-cell range trails (lots of those here in Ontario)—there are other items that are useful, even essential.
7. BRMB App
I chose to invest in the Back Road Map Books app, and installed it on my Garmin GPS mounted to my bike. It shows you exactly where you are in the bush in real time, but more importantly, it shows you where there's Crown land you can ride, and where private property is so you can avoid it. It also shows “colonial roads,” ATV club trails, snowmobile trails, and many other fascinating things. I highly recommend it!
8. Spot GPS
Another essential item for remote riders is the SPOT satellite GPS tracking system that is quite versatile, and cost effective. Some plans are $13 USD a month, and can be activated one month at a time (while you need it). It allows people like friends and family members to track you from their home computer, and most importantly, you can transmit a message for help that includes your exact location from anywhere in Canada. Even better, you can also receive a message that confirms it was received, and help is actually on the way!
9. Satellite Phone
The last item I recommend for remote riders is the most expensive option. Satellite phones work pretty much everywhere, but rentals are available, making them more feasible for some. Canada Satellite has plenty of options to check out, other satellite and cellular companies do as well, so feel free to shop around for them.
10. A Winch
At least one bike in any group needs a winch, preferably all bikes.
Other Recommended Essentials
Correct permits from OFATV or ATVO
Boots & Gloves
Water & snacks
Change of clothes for the ride home
For the More Advanced Ride
Extra fuel. Some people choose to pack a couple of gallons of fuel, I generally don't. I have a pretty full bike without the additional weight of the extra gas, and I am well aware of the range of our bikes (about 130 km, that’s pretty far on an ATV).
Bow saw
Two items that have got me out of the very deep bush three separate times is a can of starting fluid and a BBQ lighter. This is in case all else fails trying to re-seat the bead on a tire after knocking it off (we rock climb a lot on steep hills). It’s easy to knock the bead off and be stuck, then be unable to get air back in the tire, even with a strap around the centre of the tire and a compressor. In a jam, I spray a quick shot of starting fluid inside the tire, (a small amount only) then step away as far as possible (with others even further away) and use the BBQ lighter to ignite the starting fluid. That will “pop” inside the tire and push it out and right back onto the bead, where it can then be aired up properly. This is an advanced maneuver that is not for everyone, and only for emergencies after everything else has failed.
Plan Your Own ATV Ride Today
I have spent a fair bit of time exploring remote ATV trails, and if you're interested in planning your own backcountry trip, check out these itineraries where I walk you through some pretty cool adventures: Ghost Town Rides of Ontario Part 1 and Ghost Town Rides of Ontario Part 2. These are very tough rides through unmarked backwood trails that had no club, and where it was super easy to get lost. More importantly, it was super easy to ride right into private property without even knowing it, and that’s a real no no, and disrespectful.
Not riding alone, especially far from help may be your best safety tool of all. Ride safe, and manage all risk!
Recommended Articles
The Complete 2025 List of ATV Events in Ontario
Guided ATV Tours
Confessions of a First Time ATV Rider: Mattawa Voyageur Multi Use Trails
6 Reasons Why Mattawa is Canada's Off Road Capital
ATV Riding the Ottawa Valley: A 2-Day Itinerary

18 Best ATV Cabin Rentals

Never Get Lost Again
As If Anyone Needed Convincing
5 Things I Learned ATVing For the First Time
Ontario’s North Country ATV Trout Tour

Vintage ATVs: A Guide to Your Favourite Rides

